In this series we will be learning how to leverage a lot of the awesome features Firebase has to offer. A few of the things that will be covered are: hosting, auth, Firestore, and Storage.
We previously covered what Firebase is in this blog post GCP serverless, now we are going to build an app using it and google’s front end framework Angular. In this post we will cover how to set up an Angular app with Firebase and login with a Google account.
We are going to be building a chat application called Fireside. To start we first need to go set up a new Firebase project, to do that go to the Firebase Console and click Add project. When prompted name the project Fireside and click continue.
extra info:
Project id can be changed to anything as long as it's not already taken. Your project id determines the subdomain for your app (ie: https://fireside-ff9d5.firebaseapp.com/).
Once you create a Firebase project you cannot change it's location, since this app is just to learn it wont matter but for production app's you are going to want to make sure it is multi-region (it defaults to multi-region us-central) for high availability.
Now that we have created the Firebase project we need to create the angular project, we are going to use the angular cli to set up a new an Angular project. In your terminal run the following:
npm i -g @angular/cli
ng new fireside
cd fireside
When asked if you would like to add Angular routing? Type Y and enter. For stylesheet format, we are going to use Sass.
Ok now we have an Angular project but we need to connect it to Firebase, thankfully there is an awesome project out there that does a lot of the heavy lifting, Angular Fire. So we are going to install their package:
npm i firebase @angular/fire --save
Now that we have that installed we are going to set up the Firebase config, in the angular project open /src/environments/environment.ts. Then open back up the Fireside Firebase console, on the main page (Project Overview) there are 4 little icons. We want to click on the </> one.
When the popup appears copy the json block after config = and add it to the environment file as Firebase
export const environment = {
	production: false,
	firebase: {
		apiKey: "Your Api Key",
		authDomain: "your.fireside.firebaseapp.com",
		databaseURL: "https://your.fireside.firebaseio.com",
		projectId: "your.fireside",
		storageBucket: "your.fireside.appspot.com",
		messagingSenderId: "messagingSenderId"
	}
}
Now we need to import the AngularFireModule’s into the AppModule and use the environment variable we just set up. We are going to import the Firestore, Auth, and Storage modules as well as we will want them later.
import { BrowserModule } from '@angular/platform-browser'
import { NgModule } from '@angular/core'
import { AppComponent } from './app.component'
import { AngularFireModule } from '@angular/fire'
import { AngularFirestoreModule } from '@angular/fire/firestore'
import { AngularFireStorageModule } from '@angular/fire/storage'
import { AngularFireAuthModule } from '@angular/fire/auth'
import { environment } from '../environments/environment'

@NgModule({
  imports: [
    BrowserModule,
    AngularFireModule.initializeApp(environment.firebase),
    AngularFirestoreModule,
    AngularFireAuthModule,
    AngularFireStorageModule
  ],
  declarations: [ AppComponent ],
  bootstrap: [ AppComponent ]
})
export class AppModule {}
So now if we run ng serve we should get the Welcome to my-app with the angular logo and it connects to Firebase (even though we are not doing anything with it yet).
Authentication
We going to use Google’s built-in Gmail provider for this example. In the Firebase Console left sidebar click Authentication and from there click the tab for Sign-in method.
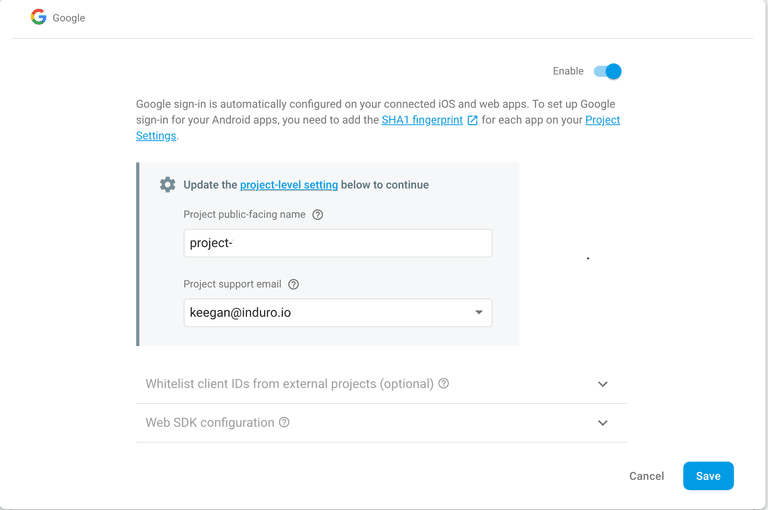
In the list that appears select Google and in the box that shows up you will need to toggle Enable at the top right and enter a Project support email (where keegan@induro.io is replace with your email) and click save.
Now that we have that enabled we need to set up login for our app. Let’s go back to the Angular project and inside of /src/app/ we are going to create a folder called login.
Inside of login, we are going to create three files, login.component.ts, login.component.html and index.ts.
Open login.component.ts and paste in the following.
import { Component } from '@angular/core'
import { AngularFireAuth } from '@angular/fire/auth'
import { auth } from 'firebase/app'

@Component({
    selector: 'login',
	templateUrl: './login.component.html',
})
export class LoginComponent {
    constructor(
		public afAuth: AngularFireAuth
	) {}
	login() {
	  this.afAuth.auth.signInWithPopup(new auth.GoogleAuthProvider())
	}
	logout() {
	  this.afAuth.auth.signOut()
	}
}
Open login.component.html and paste in the following.
<div *ngIf="afAuth.user | async as user; else showLogin">
	<h1>Hello {{ user.displayName }}!</h1>
	<button (click)="logout()">Logout</button>
</div>
<ng-template #showLogin>
	<p>Please login.</p>
	<button (click)="login()">Login with Google</button>
</ng-template>
So let’s unpack what we just added, the AngularFireAuth service comes with a few different out of the box login providers (the list we were looking at in the Firebase console earlier). The login component that checks if the user is logged in with AngularFire and if not gives them the ability to login via clicking the Login with Google button. This then opens a popup (using the this.afAuth.auth.signInWithPopup method) and allows them to select their google account to login.
Now let’s make it actually work. We need to import the component into the app.module.ts and make it show up on load.
Copy and paste this into app.module.ts:
import { BrowserModule } from '@angular/platform-browser'
import { NgModule } from '@angular/core'
import { AngularFireModule } from '@angular/fire'
import { AngularFireAuthModule } from '@angular/fire/auth'
import { AngularFirestoreModule } from '@angular/fire/firestore'

import { AppRoutingModule } from './app-routing.module'
import { AppComponent } from './app.component'
import { LoginComponent } from './login'
import { environment } from '../environments/environment'

@NgModule({
    declarations: [AppComponent, LoginComponent],
    imports: [
        BrowserModule,
        AppRoutingModule,
        AngularFireModule.initializeApp(environment.firebase),
        AngularFireAuthModule,
        AngularFirestoreModule,
    ],
    providers: [],
    bootstrap: [AppComponent],
})
export class AppModule {}
and put this into app-routing.module.ts:
import { NgModule } from '@angular/core'
import { Routes, RouterModule } from '@angular/router'
import { LoginComponent } from './login'

const routes: Routes = [
    {
        path: '',
        component: LoginComponent,
    },
]

@NgModule({
    imports: [RouterModule.forRoot(routes)],
    exports: [RouterModule],
})
export class AppRoutingModule {}
If you are not already running the project run ng serve, when you go to http://localhost:4200 you should see the Login with Google button. If you click it and choose a Google account, it should now display Hello {{your name}}!
A Link to the repo can be found here.
—
In the next post, we will show you how to use Firebase’s Firestore Database to manage users and conversations.
Keegan Rice
Keegan is a software developer who is passionate about learning and improving. He is primarily a web developer (JavaScript Ninja) who has worked in a variety of applications and layers from SQL to CSS, with some C# and NodeJS in the middle. His passion extends past the keyboard and he is excited about helping business understand how to quickly get their product into the hands of their customer and to continue delivering value day after day.


